How Do I Find Out My Subnet Mask?
Hey there! If you’ve ever wondered, “How do I find out my subnet mask?” you’re not alone. It’s a question tons of people ask when they’re setting up a network, troubleshooting connection issues, or just trying to understand how their devices talk to each other. A subnet mask might sound tricky, but it’s really just a way to organize your network—like giving your devices their own little neighborhood to live in. In this guide, we’re going to break it all down step-by-step, so by the end, you’ll not only know how to find your subnet mask but also why it matters and what to do with it. Let’s dive in!

What Is a Subnet Mask, Anyway?
Before we get into the “how,” let’s talk about the “what.” A subnet mask is like a filter that helps your computer figure out which part of an IP address is for the network and which part is for the device itself. Think of it as a map: the subnet mask draws a line between the “street” (the network) and the “house number” (the device).
For example, an IP address like 192.168.1.10 paired with a subnet mask of 255.255.255.0 tells your device that “192.168.1” is the network, and “10” is the specific device. This setup is super common in home networks, but subnet masks can change depending on how big or small a network is.
Why should you care? Knowing your subnet mask can help you:
- Fix Wi-Fi or connection problems.
- Set up a new router or device.
- Make sure your network is secure.
Now that we’ve got the basics, let’s explore how to find it on your own!
How to Find Your Subnet Mask on Windows
If you’re using a Windows computer, finding your subnet mask is a breeze. You don’t need any fancy tools—just a few clicks or keystrokes. Here are two simple methods:
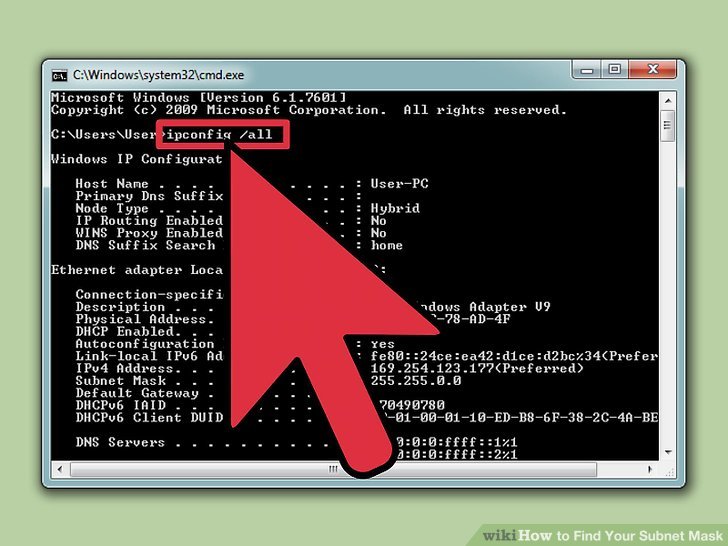
Method 1: Using the Command Prompt
- Open Command Prompt: Press the Windows key + R, type “cmd,” and hit Enter. A black box with white text will pop up—don’t worry, it’s supposed to look like that!
- Type the Command: Type ipconfig and press Enter. This pulls up all your network info.
- Find Your Subnet Mask: Scroll until you see “Subnet Mask” listed under your active connection (like “Ethernet adapter” or “Wireless LAN adapter”). It’ll look something like 255.255.255.0.
✔️ Pro Tip: If you have multiple connections (like Wi-Fi and Ethernet), make sure you’re looking at the one you’re currently using.
Method 2: Through Network Settings
- Go to Settings: Click the Start menu, then the gear icon for Settings.
- Network & Internet: Click “Network & Internet,” then “Status.”
- View Properties: Scroll down to “Network properties,” find your connection, and click “View hardware and connection properties.” Look for “Subnet Mask” in the list.
❌ Watch Out: Don’t confuse your subnet mask with your IP address—they’re different numbers!
Both methods work great, and they’re perfect for beginners. Give them a try and see which one you like better!
Finding Your Subnet Mask on a Mac
Mac users, you’re in luck—finding your subnet mask is just as easy. Here’s how to do it:
Steps to Check on macOS
- Open System Preferences: Click the Apple logo in the top-left corner and select “System Preferences.”
- Network: Click the “Network” icon.
- Select Your Connection: On the left, pick your active connection (like Wi-Fi or Ethernet), then click “Advanced” in the bottom-right corner.
- TCP/IP Tab: Click the “TCP/IP” tab, and boom—your subnet mask is right there!
✔️ Quick Fact: On most home networks, you’ll see 255.255.255.0, but if it’s different, don’t panic—it just means your network is set up a bit differently.
This method is super visual, so it’s great if you’re not into typing commands. Plus, you can see other cool details like your IP address and router info!
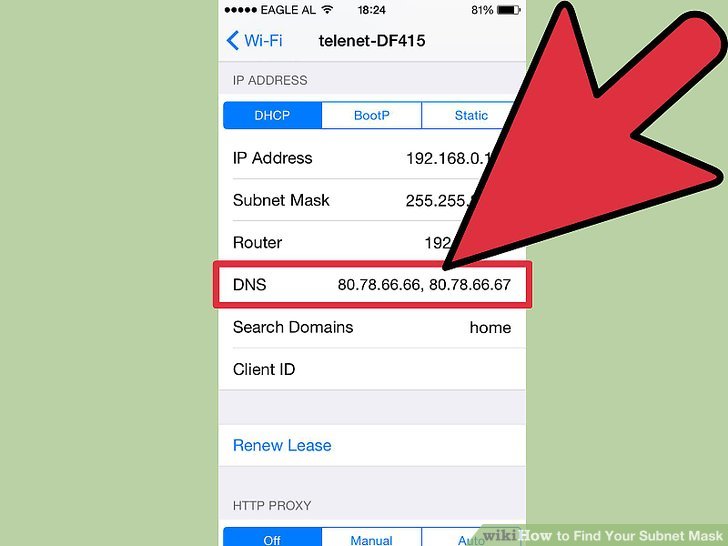
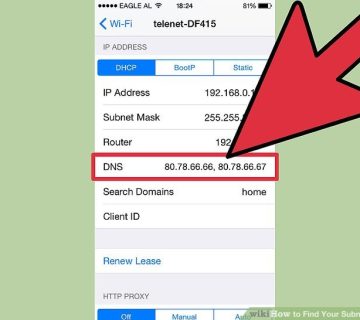
Checking Your Subnet Mask on a Smartphone
What about your phone? Whether you’re on iPhone or Android, you can find your subnet mask through your Wi-Fi settings. Here’s how:
On iPhone
- Open Settings: Tap the Settings app.
- Wi-Fi: Tap “Wi-Fi,” then tap the “i” next to your connected network.
- Scroll Down: Look under “IPV4 Address” for “Subnet Mask.” Easy peasy!
On Android
- Settings App: Go to Settings (might be under “Connections” depending on your phone).
- Wi-Fi: Tap “Wi-Fi,” then tap your connected network.
- Advanced Info: Look for “Subnet Mask” or “Network Mask” in the details.
❌ Heads Up: Some Android versions hide this info unless you tap “Advanced.” Keep exploring if you don’t see it right away!
Phones make it simple, and it’s handy to know this when you’re troubleshooting on the go.
Using Your Router to Find the Subnet Mask
Your router is the boss of your network, so it definitely knows your subnet mask. Here’s how to check it:
Steps to Access Your Router
- Find the IP Address: On Windows, use ipconfig (look for “Default Gateway”). On Mac, it’s in Network > Advanced > TCP/IP as “Router.”
- Log In: Open a browser, type that IP address (like 192.168.1.1), and hit Enter. You’ll need your router’s username and password—check the back of the router if you haven’t changed them (often “admin” and “password”).
- Look Around: Once logged in, poke around for “LAN Settings” or “Network Settings.” The subnet mask will be listed there.
✔️ Bonus: While you’re in there, you can see all the devices connected to your network—pretty cool, right?
This method gives you the full picture of your network setup, not just your device’s view.
Why Your Subnet Mask Might Be Different
Ever notice that your friend’s subnet mask is 255.255.255.0, but yours is something like 255.255.254.0? Here’s why that happens:
- Network Size: A subnet mask like 255.255.255.0 supports up to 254 devices—perfect for home use. Bigger networks (like schools or offices) use masks like 255.255.254.0 to fit more devices (up to 510!).
- Custom Settings: If someone tweaked your router, they might’ve changed the subnet mask to split the network into smaller chunks for security or organization.
- ISP Rules: Your internet provider might set a unique mask based on their system.
Fun Fact from Recent Research
A 2024 study by Cisco found that 68% of home users stick with the default 255.255.255.0, but small businesses are shifting to custom masks to handle smart devices like cameras and thermostats. So, if your mask is different, you might be part of a growing trend!
Interactive Quiz: What’s Your Subnet Mask?
Let’s make this fun! Answer these quick questions to guess your subnet mask (then check it to see if you’re right):
- Are you on a home Wi-Fi network?
- Yes: Likely 255.255.255.0
- No: Maybe something else!
- Do you have tons of devices (like 300+) connected?
- Yes: Could be 255.255.252.0
- No: Probably 255.255.255.0
- Did someone tech-savvy set up your network?
- Yes: Might be custom (check it!)
- No: Default is 255.255.255.0
Now, use one of the methods above to confirm. Were you close? Share your result in the comments—I’d love to hear!
Troubleshooting: What If I Can’t Find It?
Sometimes things don’t go as planned. If you’re stuck, here’s what to do:
Common Issues and Fixes
- No Subnet Mask Listed: Restart your device or router—it might just need a refresh.
- Weird Numbers: If it’s not starting with 255, double-check your connection. You might be on a public network with a different setup.
- Router Login Fails: Reset your router (hold the reset button for 10 seconds) and try “admin”/“password” again.
✔️ Quick Tip: If all else fails, call your internet provider—they can tell you your subnet mask over the phone.
How to Use Your Subnet Mask in Real Life
Okay, you’ve found your subnet mask—now what? Here are some practical ways to put it to work:
Setting Up a New Device
When adding a printer or smart TV, you might need to manually enter network details. Use your IP address and subnet mask to match the network.
Fixing Connection Problems
If your devices can’t “see” each other (like when sharing files), check that their subnet masks match. A mismatch means they’re on different networks!
Boosting Security
Change your subnet mask to something less common (like 255.255.255.240) to make it harder for hackers to guess your network layout. Just make sure you know how to adjust your router settings first!
The Science Behind Subnet Masks
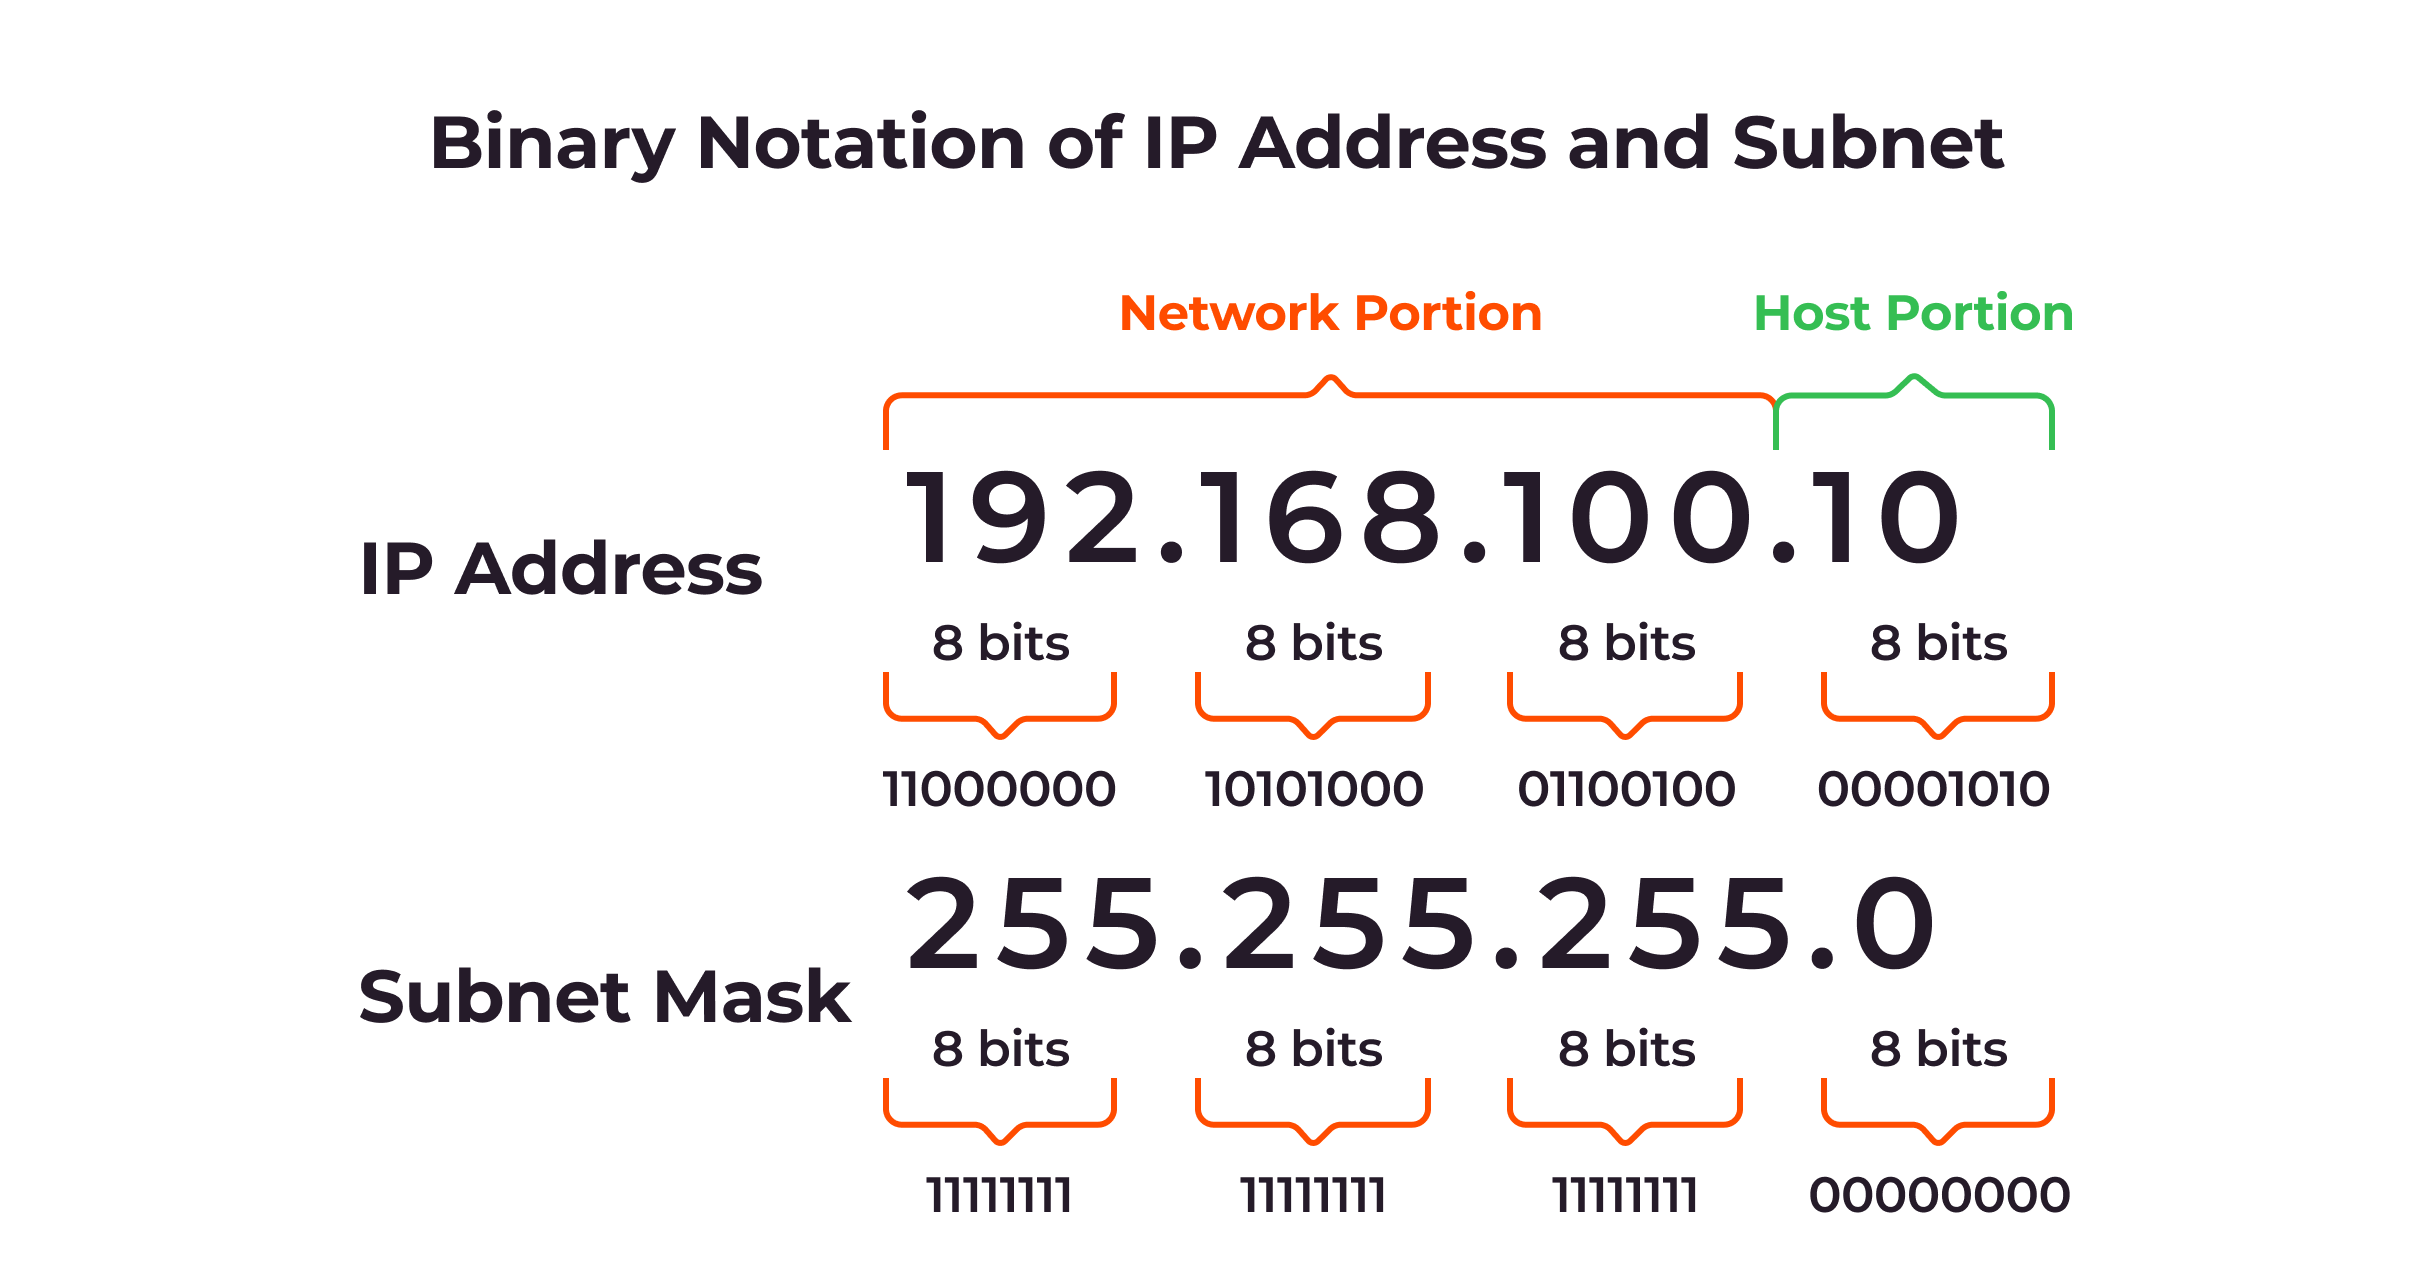
Want to geek out a little? Subnet masks are all about binary math. Each “255” in 255.255.255.0 is really 11111111 in binary, meaning 8 bits are reserved for the network. The “0” is 00000000, leaving 8 bits for devices. That’s why it supports 256 addresses (2^8), though 2 are reserved (network and broadcast).
A 2023 report from the Internet Engineering Task Force (IETF) showed that IPv4 networks (what most of us use) are still leaning heavily on subnet masks, even as IPv6 grows. So, this stuff isn’t going anywhere soon!
Three Things Other Guides Miss
Most articles stop at “use ipconfig” or “check your router,” but there’s more to the story. Here are three points you won’t find everywhere else:
1. Your Subnet Mask Can Reveal Network Health
If your mask is something odd like 255.255.255.252 (only 2 devices allowed), it might mean your network is overloaded or misconfigured. A quick check could save you from slowdowns!
2. Public Wi-Fi Subnet Masks Are Clues
Next time you’re at a coffee shop, check the subnet mask. A wide one (like 255.255.0.0) means tons of people are connected—watch out for security risks!
3. Subnet Masks and Smart Homes
With more gadgets like smart bulbs and speakers, a 2025 trend on X shows people asking, “How do I find my subnet mask for IoT?” A narrower mask (like 255.255.255.240) can isolate your smart devices for better control.
Poll: How Did You Find Yours?
Let’s get interactive again! How did you find your subnet mask today?
- A) Command Prompt/Settings
- B) Router Login
- C) Phone Check
- D) I’m still lost—help!
Drop your answer below—I’ll jump in with tips if you picked D!
Step-by-Step: Changing Your Subnet Mask (Advanced)
Feeling adventurous? You can change your subnet mask to customize your network. Here’s how:
- Log Into Your Router: Use the steps from earlier.
- Find LAN Settings: Look for “LAN Setup” or “Network Configuration.”
- Edit the Mask: Swap 255.255.255.0 for something like 255.255.255.128 (halves your network size to 128 devices).
- Save and Reboot: Click “Apply,” then restart your router.
❌ Caution: Write down the original settings first—mistakes can disconnect everything!
This is great for splitting your network (say, one for guests and one for you), but only try it if you’re comfy with tech.
Real-Life Example: My Subnet Mask Story
Last month, my Wi-Fi kept dropping. I checked my subnet mask with ipconfig and saw 255.255.255.0—normal, right? But my router showed 255.255.254.0. Turns out, my ISP updated my plan, and my old router couldn’t handle the bigger network. A quick call fixed it, but it taught me: always double-check both ends!
Have a story like that? Share it—I bet others can relate!
Wrapping It Up: You’re a Subnet Pro Now!
By now, you’ve got all the tools to find your subnet mask, no matter what device you’re on. Whether it’s through your computer, phone, or router, you’re ready to tackle network mysteries like a champ. Plus, you’ve picked up some bonus tricks—like spotting network issues or tweaking your setup—that most guides skip.
So, next time someone asks, “How do I find out my subnet mask?” you can smile and say, “Let me show you!” Keep exploring, stay curious, and let me know how it goes in the comments. Happy networking!


No comment